 Tweet
Tweet
Movie Compression Techniques
I have found my self explaining the best way to compress BF2 video numbers of times so I have created this handy guide for any Sir. Video producers.-
-------------------------------------------------------------------------
1) Battlelauncher - (http://www.battlelauncher.com/ )
I don’t like using this but unless you have a very high spec computer it’s the only way to get a high quality movie. There are plenty of guides out the explaining how to use this piece of software so I won’t write about that here.
- http://www.battlelauncher.com/index.php?pg=post&id=26 (A very comprehensive usage guide)
- http://www.followme2.com/phpfusion/h...read_id=54#165 (this isn’t the most up-to-date but contains a lot of good information.)
When you get the choice to choose a codec and render your camera track you can choose to render it uncompressed. But doing this means it will take up a huge amount of HDD space, and also some editing software may not like the format that is in. Through looking on goggle and numbers of test I found the best codec to use is the Ligos Indeo Codec 5.11. This is a very good balance between quality and size (almost perfect quality). When using it you will want to set the quality between 85% - 100% (I use 100%) for best results.
It can be found here:
-http://www.free-codecs.com/download/Indeo_Codec.htm
-------------------------------------------------------------------------
2) Editing programs
This only applies to Premiere and Vegas (maybe several other types of software but this is all I have used), While this method can be used with windows movie maker its not really worth it as it has a suitable built in compression program.
Generally when you import video into your chosen editing software you will want it to be uncompressed (mainly in the case of fraps recordings) but it is fine if your compressed video is of a very high quality (e.g. the Indeo codec). When you have edited all your clips and are ready to render the are few things you need to do to make sure its at its optimum quality. But the main thing to remember is always render it out as an uncompressed format. The main reason for this is DivX or XVid codecs are not normally compatible with Premiere and Vegas. The DivX codec will be used later in the compression but for now there are few settings you need to change.
These following settings are what I use and work well in most cases.
Compressor / Format = Uncompressed
You will probably have a long list of available codecs to choose from here but unless you have tested them all and found a good one always choose uncompressed.
Timebase / Frame rate = 25.00
You will rarely need more than 25 FPS for your final render as this plays smoothly and helps to keep the filesize down.
Framesize = 720 x 480
This is one of the factors that can vary quite a bit depending on how you want the movie to look. Using 720 x 480 is a standard resolution that is commonly uses but for a smaller files 640 x 480 works well. But what ever you use it won’t really matter, choose what fits you project.
Pixel aspect ratio = 1.00
I use this almost all the time because if you have shapes e.g. the Sir. Sign that have a set shape change this may affect the way it looks. But you alter this if you want to get different wide screen style results.
These explain most of the main options; I will explain the other more advanced things another time when I update this guide. So you can leave them all as standard/how you found them.
Audio rendering options.
Now you get to choose audio options before rendering.
Compression = Uncompressed
Again it is best to leave this uncompressed and compress this with another program at the end.
Sample rate = 48,000
The higher the rate the higher the quality but the bigger the file size, using 48,000 is a good balance although you may consider going higher sometimes. This can also be change later if you choose a high rate but desire greater compression.
Bit depth = 16
This is a pretty standard value and there is no need to alter it.
Channels = stereo
This is one of those things that depends how advanced sounds in you project are going to be. Mono is simple and probably shouldn’t be used unless it’s a very simple movie. Stereo is the next step-up and can create reasonable sound effects and is what I use. If you want to go even further you can start using surround sounds like 5.1 although this can add a lot of effort into you production.
After having set this up you are now finally ready to render out your movie.
By using these settings it will create a very big file size, probably around 1gb per minute or higher. But this will be sorted out in the next stage.
-------------------------------------------------------------------------
3) Final Compression
I use VirtualDub to do this, as it is a free (legal) program that does its job very well. It can be found here- http://www.virtualdub.org/
The codec im going to use is the latest DivX one if you want to know more about why look here - http://www.machinima.com/article.php?article=159
DivX has a large number of features and things that can be done for some more advanced explantions visit here - http://www.divxmovies.com/guides/
DivX can be found and downloaded from here - http://www.divx.com/
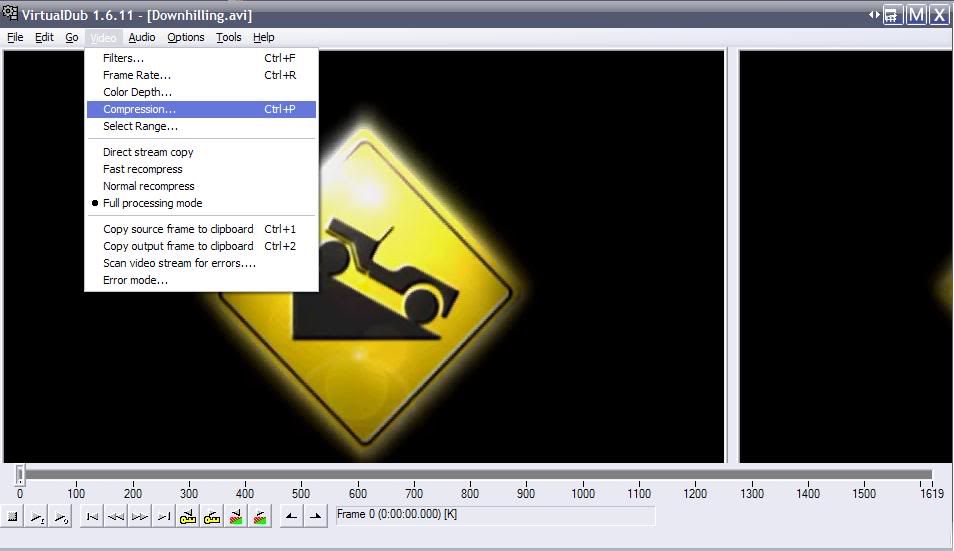
a)Firstly go to File > Open video file and choose then file that you just rendered.
Then go to Video > Compression and you will get presented with a list of codecs. From this you will want to choose DivX 6.1.1 Codec (1 Logical CPU), next click configure.
b) This is pretty much how you control the final size a quality of your project. The certificate profile allows you to choose presets but you probably won’t use this most of the time. The main thing you will need to change in this window is the Bitrate speed. I reccomend setting this at value between 2000 - 3000 for good quality but maybe slightly lower in some cases.
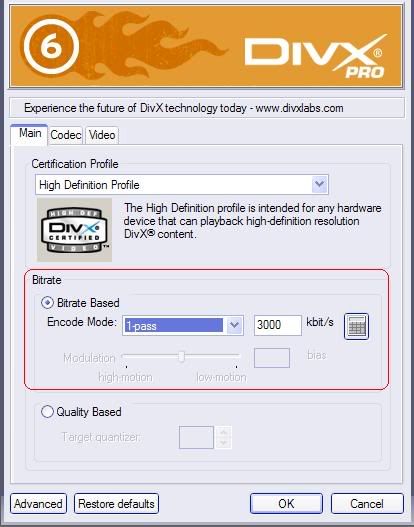
At the bottom the is a quality based way to do it. 1 is the highest quailty and biggest filesize. This can be good to use sometimes and is best to set at anywhere from 1 - 5, any lower and the quality quickly becomes very bad. I mainly stick with the bit rate though.
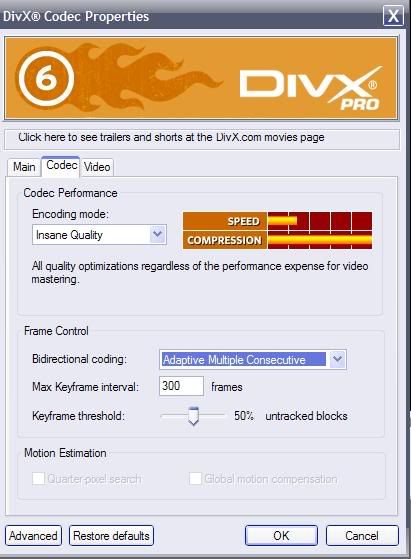
c) On the codec tab you will always want to set “Encoding mode” to insane quality. It takes the longest but is worth the extra time. Also its best to leave frame control alone unless you know what you are doing with it.
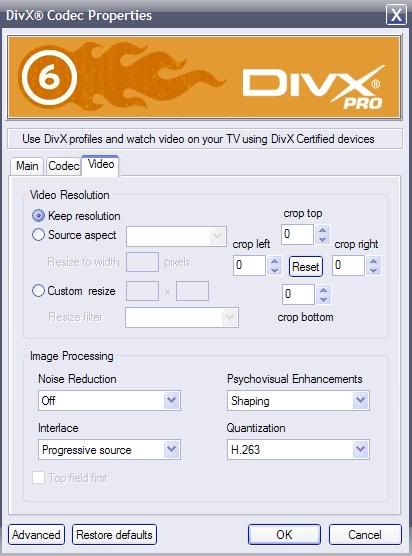
d) Finally there is the video tab. Here you can choose to resize the Video again but it’s normally best to leave this on “keep resolution”. Noise reduction can be a way to smooth the image but can also add ghosting so you may want to have this off or set it to light. The other options don’t do to much but you may want to play around with them.
-------------------------------------------------------------------------
Audio Compression
If this is left uncompressed it can often cause very big video sizes and it is not the video codec that should be blamed. This can be sorted by following these few steps.
Before it is setup you will need to adjust a few of the audio options. Go to Audio > Full Processing mode and switch it on. Then go to Audio > Compression and you will be presented with another list of codecs. Here you want to make sure you use a standard codec so people don’t have problems hearing the sound. So for this choose the MPEG layer-3 . It Then doesn’t really matter which option you choose but the higher in the list the bigger the filesize and higher the quality. I normally use the 48 Kbits option.

Final go to File > Save as AVI.
It will now render you finished movie, nice and compressed. You may have to play around a bit with the actual settings but hopefully this gives you a good starting point.
Hope this helps, if any of you big movie producers have more to add please say so I can edit this post.
Sir. Xios
I have found my self explaining the best way to compress BF2 video numbers of times so I have created this handy guide for any Sir. Video producers.-
-------------------------------------------------------------------------
1) Battlelauncher - (http://www.battlelauncher.com/ )
I don’t like using this but unless you have a very high spec computer it’s the only way to get a high quality movie. There are plenty of guides out the explaining how to use this piece of software so I won’t write about that here.
- http://www.battlelauncher.com/index.php?pg=post&id=26 (A very comprehensive usage guide)
- http://www.followme2.com/phpfusion/h...read_id=54#165 (this isn’t the most up-to-date but contains a lot of good information.)
When you get the choice to choose a codec and render your camera track you can choose to render it uncompressed. But doing this means it will take up a huge amount of HDD space, and also some editing software may not like the format that is in. Through looking on goggle and numbers of test I found the best codec to use is the Ligos Indeo Codec 5.11. This is a very good balance between quality and size (almost perfect quality). When using it you will want to set the quality between 85% - 100% (I use 100%) for best results.
It can be found here:
-http://www.free-codecs.com/download/Indeo_Codec.htm
-------------------------------------------------------------------------
2) Editing programs
This only applies to Premiere and Vegas (maybe several other types of software but this is all I have used), While this method can be used with windows movie maker its not really worth it as it has a suitable built in compression program.
Generally when you import video into your chosen editing software you will want it to be uncompressed (mainly in the case of fraps recordings) but it is fine if your compressed video is of a very high quality (e.g. the Indeo codec). When you have edited all your clips and are ready to render the are few things you need to do to make sure its at its optimum quality. But the main thing to remember is always render it out as an uncompressed format. The main reason for this is DivX or XVid codecs are not normally compatible with Premiere and Vegas. The DivX codec will be used later in the compression but for now there are few settings you need to change.
These following settings are what I use and work well in most cases.
Compressor / Format = Uncompressed
You will probably have a long list of available codecs to choose from here but unless you have tested them all and found a good one always choose uncompressed.
Timebase / Frame rate = 25.00
You will rarely need more than 25 FPS for your final render as this plays smoothly and helps to keep the filesize down.
Framesize = 720 x 480
This is one of the factors that can vary quite a bit depending on how you want the movie to look. Using 720 x 480 is a standard resolution that is commonly uses but for a smaller files 640 x 480 works well. But what ever you use it won’t really matter, choose what fits you project.
Pixel aspect ratio = 1.00
I use this almost all the time because if you have shapes e.g. the Sir. Sign that have a set shape change this may affect the way it looks. But you alter this if you want to get different wide screen style results.
These explain most of the main options; I will explain the other more advanced things another time when I update this guide. So you can leave them all as standard/how you found them.
Audio rendering options.
Now you get to choose audio options before rendering.
Compression = Uncompressed
Again it is best to leave this uncompressed and compress this with another program at the end.
Sample rate = 48,000
The higher the rate the higher the quality but the bigger the file size, using 48,000 is a good balance although you may consider going higher sometimes. This can also be change later if you choose a high rate but desire greater compression.
Bit depth = 16
This is a pretty standard value and there is no need to alter it.
Channels = stereo
This is one of those things that depends how advanced sounds in you project are going to be. Mono is simple and probably shouldn’t be used unless it’s a very simple movie. Stereo is the next step-up and can create reasonable sound effects and is what I use. If you want to go even further you can start using surround sounds like 5.1 although this can add a lot of effort into you production.
After having set this up you are now finally ready to render out your movie.
By using these settings it will create a very big file size, probably around 1gb per minute or higher. But this will be sorted out in the next stage.
-------------------------------------------------------------------------
3) Final Compression
I use VirtualDub to do this, as it is a free (legal) program that does its job very well. It can be found here- http://www.virtualdub.org/
The codec im going to use is the latest DivX one if you want to know more about why look here - http://www.machinima.com/article.php?article=159
DivX has a large number of features and things that can be done for some more advanced explantions visit here - http://www.divxmovies.com/guides/
DivX can be found and downloaded from here - http://www.divx.com/
a)Firstly go to File > Open video file and choose then file that you just rendered.
Then go to Video > Compression and you will get presented with a list of codecs. From this you will want to choose DivX 6.1.1 Codec (1 Logical CPU), next click configure.
b) This is pretty much how you control the final size a quality of your project. The certificate profile allows you to choose presets but you probably won’t use this most of the time. The main thing you will need to change in this window is the Bitrate speed. I reccomend setting this at value between 2000 - 3000 for good quality but maybe slightly lower in some cases.
At the bottom the is a quality based way to do it. 1 is the highest quailty and biggest filesize. This can be good to use sometimes and is best to set at anywhere from 1 - 5, any lower and the quality quickly becomes very bad. I mainly stick with the bit rate though.
c) On the codec tab you will always want to set “Encoding mode” to insane quality. It takes the longest but is worth the extra time. Also its best to leave frame control alone unless you know what you are doing with it.
d) Finally there is the video tab. Here you can choose to resize the Video again but it’s normally best to leave this on “keep resolution”. Noise reduction can be a way to smooth the image but can also add ghosting so you may want to have this off or set it to light. The other options don’t do to much but you may want to play around with them.
-------------------------------------------------------------------------
Audio Compression
If this is left uncompressed it can often cause very big video sizes and it is not the video codec that should be blamed. This can be sorted by following these few steps.
Before it is setup you will need to adjust a few of the audio options. Go to Audio > Full Processing mode and switch it on. Then go to Audio > Compression and you will be presented with another list of codecs. Here you want to make sure you use a standard codec so people don’t have problems hearing the sound. So for this choose the MPEG layer-3 . It Then doesn’t really matter which option you choose but the higher in the list the bigger the filesize and higher the quality. I normally use the 48 Kbits option.
Final go to File > Save as AVI.
It will now render you finished movie, nice and compressed. You may have to play around a bit with the actual settings but hopefully this gives you a good starting point.
Hope this helps, if any of you big movie producers have more to add please say so I can edit this post.
Sir. Xios


Comment