 Tweet
Tweet
you read correctly!
Using Terragen and TPAINT together with your fav image editor (Photoshop, PSP) its not at all hard to create your Colormap, Detailmap, Undergrowth placement map, and overgrowth placement map.
FOR TPAINT INFO and DOWNLOAD, FOLLOW THIS LINK
http://www.bf2modding.net/phpBB2/viewtopic.php?t=27
Rendering the Colormap, and Detailmap in terragen requires you to be a registered user if terragen. well, it doesnt really need registration, but the unregistered version of terragen has an image size limit which will cause your colormaps and detailmaps to be less detailed. you will also not be able to create large hieghtmaps in the unregistered version
NOTE : if you are using the unregistered version, remember to resize the images to the correct size in your image editor before saving them to your level!!
First we start in BF2EDITOR :
Create a new level. for this test, I used a size : 512 scale 2 map. if your giving this a go, I'd suggest starting there!
whatever size you decide to use, REMEMBER, the size you choose here dictates the size of all the other images we are going to create!
once the level is created, jump into the Terrain editor, and switch to undergrowth mode.
setup 1 material using the dark grey color (15) as the materials color.
you can add some undergrowth types now if you want, or leave it till later, it doesnt matter (I leave it till later)
left-click on the terrain to paint a bit of undergrowth (this is so the undergrowth files are generated)
now switch to the Overgrowth mode, and do exactly the same as above, create a new material, choose the dark grey color (15) and paint a bit on the terrain.
save your level, and quit out of BF2EDITOR, its time for spending a little time in terragen!
Open up terragen
Time to generate ourselves some terrain.
first up is to make the heightmap the right size
in the landscape window, click Size...
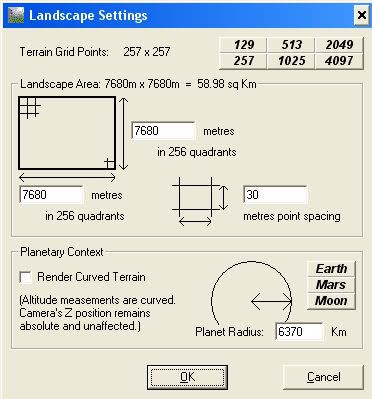
on this window, in the top right you can choose the size, I chose 513 (my level size + 1)
just say yes to all the little boxes that pop up, we have no terrain atm, so these arent going to effect anything!
ok, click generate terrain... in the Landscape window and make your terrain!
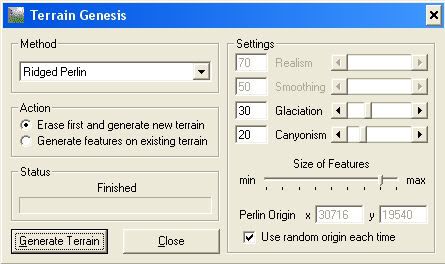
these are the options I used for this test
once you are happy with the way the hieghtmap looks, close this window, and click on the Modify... button in the Landscape window
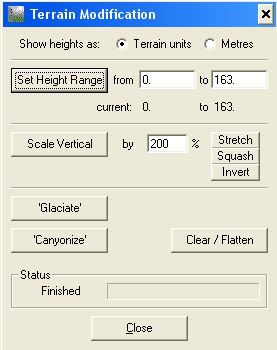
set the units to Terrain Units, then set the Heightrange from 0 to 164 and click Set Height Range.
close the window
the next step is to set up or surface map (the colors on the terrain)
if you havent done this before, it may take a bit of practice to get used to the different options!

Some things to consider. when we generate the detailmap, only 3 types of detail can be used. this does not mean that you can only have 3 types of surfaces, just remember this when choosing your surface. I have a very basic way of working this out. I use Grass, Rock, Dirt. this covers almost all terrain types and is easy to remember
when creating a surface map in terragen, you start with one material, SURFACE MAP. the main material. this material covers the entire map, and can be tricky to decide what catagory to put it in. I start off by setting this to black. and change it last to suit the other surface materials, but thats up to you.
add as many child materials to SUFACE MAP as you like, using Advanced Distribution settings to decide how the materials is placed on the terrain.
use the preview render option in the Rendering Control window to have a look what your materials look like.
Once your happy with the colors and placement of the materials, now is a good time to save your surface map (this is NOT the colormap, a surface map file is used by terrain generators to define materials for terrains)
in the Landscape window, under the Surface Map heading, there is a save button. click it and give your surfacemap a name (such as greenmountain).
Its about time to save our heightmap, click the EXPORT button in the Landscape window and choose these settings
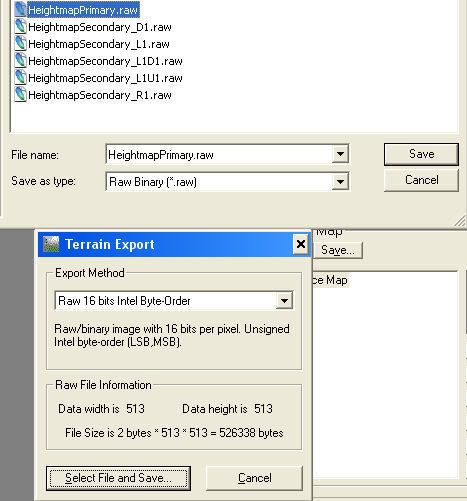
and then save your hieghtmap into mods/bf2/levels/*MYLEVEL*/ overwriting the HeightmapPrimary.RAW file.
ok, now we need to setup the camera, the sun, and the atmosphere so we can render our colormap.
Under Rendering Control you will find a Camera Settings button, click that and you will get this window

set your settings up so they look the same as this window!
under the heading Zoom Magnification, after you have ticked Orthographic click on the AutoSetup button, and say yes to the popups. this will ensure the camera is corectly positioned!
close down the camera settings window, and goto the View... menu and choose Lighting
change the lightsettings to match the above image.
next is atmosphere, click the View... menu and choose atmosphere
move the density sliders so they are like above.
the last thing to do is set the image size. theres an easy way to work out how big it should be. take the size of your map (512) and multiply it by 4 (2048). see I told you to remember that size setting!
ok, make sure you slide the detail slider in the Render Control window all the way to the right. you can click preview render if you like, to a quick look at whats going to come out.
click the render button, and wait (can take up to 20 minutes depending on your heightmap size)
once its done save the file into your level folder
now we need to change the surface map and lighting to generate our detailmap.
detailmaps use colors to designate what material layer in BF2editor goes where, so we need to change the surface colors to match.
The reason we use only 3 types of detail is to make things nice and easy!
change the areas you want grass detail to pure blue, the areas for rock to pure red, and the areas for gravel to pure green. make sure you slide the bumpiness and mimick terrain sliders all the way to the left
open up the lightsettings again, and change the sun intesity to 255%
this ensures that the colors are infact there pure versions.
once this is done, render the image again for some funky pyskodelic action!
once its done, save the file into your levels folder
alrighty! were starting to get there now. next up is undergrowth and overgrowth, these are by far the most involved of this process, not in terragen, but in your image editor which we will get to in a minute.
for now, you need to again change your surface map colors. this time, set the areas you dont want undergrowth to be on (say gravel and rock) to black, and areas you do to white.
if you want, you can of course create a new surface map with different options to create your undergrowth and overgrowth maps. this gives you much better control, but for this exercise we will just use the surface map we have already.
for this, we need to change the rendered image size to youmapsize(512) + 1 (513)
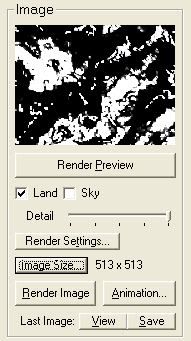
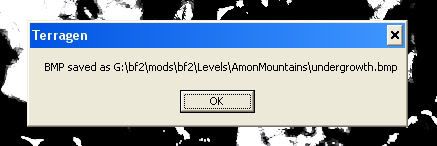
click render, and when its done, save this to your levels folder aswel
now depending on how your terrain is setup, and how you want your overgrowth to look, you may need to create a new surface map, or change some of the Advanced Distribution settings so that the overgrowth does not cover the same space as the undergrowth.
(I simply changed the coverage, and the minimum and maximum angle settings on my surface map to create "patches" of overgrowth)
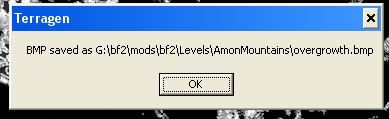
after you have set this up, we need to render the image again, and yes, save it to your levels folder
OK, well that was a bit confusing no doubt. well we are now finished with Terragen, you can close it down now.
now its time to jump into our image editor and do some editing. for this part of this tutorial (I guess you could call it that) the details of how to do each step wont be explained. I used Paint Shop Pro to do all this, but those of you who use your image editor regularily will no doubt know how to do the things I talk about.
First up is the heightmap. for some unknown strange and freaky reason, when you load the level in BF2EDITOR the hieghtmap is the wrong way around. in order for your colormap, detailmap undergrowth and overgrowth to line up, you need to flip the heightmap VERTICALLY and then re-save it.
now would be a good time to run a smooth or blur effect onto the terrain, this is not necassery, but a low-level blur or smooth will help to make moving over your terrain easier. whether or not you should do this is mainly decided by your hightmap, and how grainy it looks.
alright, next is the colormap and detailmap.
both of these files simply need converting to TGA (24bit) and saved into the BF2_TPAINT directory under your levels main directory.
for the colormap, save it as COLOURBIG.TGA and your detailmap should be saved as DETAILBIG.TGA.
when you have the detailmap open, you may wish do run an average or blur filter on it. remember that in the BF2EDITOR, the detail textures can fade into each other. I use an average filter before saving my detailmap. but this is not a necassery step
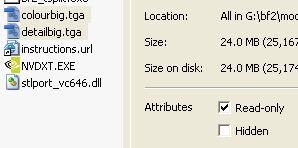
now jump into Windows Explorer, and navigate yourself to these two files.
both of these files need to be set to read-only (I will explain why later), so do this now so we dont forget!
OK, Undergrowth and overgrowth. this is probably the most confusing part, I could not work out how to do this in Photoshop, but I am only new to photoshop, but have had Paint Shop Pro for several years. so Im sure you will know how to do these steps.
NOTE : these are the steps used in paint shop pro. you may not need to do all of these in other programs.
Open up undergrowth.BMP (or whatever you saved it as)
reduce the colors on the image to 2, using the nearest color option.
right, now the image is just plant old black and white, just what we need.
next, convert the image to greyscale.
using the COLOR REPLACER tool, we want to replace all the WHITE with almost black. Red : 15, Blue : 15, Green : 15 to be exact.
(now I dont know if its pure coincidence that the RGB values are the same as the material color number from BF2EDITOR. but I think its like that on purpose!)
now replace all the white with the R:15 G:15 B:15 color.
you should have a hard time seeing this color, thats a good thing!
alright. thats it for undergrowth, not that confusing hey (ok it was) now we save the image.
In your levels main directory there is a file called Undergrowth.RAW this is the file we want to replace. make sure when saving you have 0 header information and IBM byte order.
now, for overgrowth we do EXACTLY the same process above. so load up the overgrowth.BMP (or whatever you called it) and do the steps above, using the same R:15 G:15 B:15 color to replace the white.
this time, save this file as Overgrowth.RAW in the Overgrowth folder of your level.
THE FINAL PHASE
ok, now we are ready to use TPAINT to create our devided color and detail maps.
if you do not know how to use the TPAINT program, I would suggest having a read through the tutorial from the link above. for installation and use information.
jump into the BF2_TPAINT forder, and run BF2_TPAINT.EXE untick these options
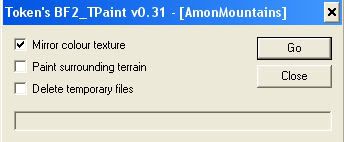
click go, and wait for it to finish.
now I told you I would explain why we need to set those files to read-only.
Well, when you run TPAINT, it generates the two files COLOURBIG.TGA and DETAILBIG.TGA which it then uses BF2_TSPLIT to break them up into the DDS files BF2 uses. if they are not read only, TPAINT will overwrite them with its own generated colormap and detailmap, which is a bad thing for us!.
ok, now as the instructions for TPAINT state, you now need to copy the Colormaps and Detailmaps folders to *yourlevel*/editor folder replacing the two folders that are already there.
EXCELLENT. now its finally time to jump back into BF2EDITOR and finish this off!
load your level back up, watch the debug window for any "could not load" etc. if this happens, one of several things could be wrong. you have saved a raw file in the wrong format, or one of the raw files is not the right size. if you were paying attention, you will have seen which file it was loading, and which file to redo.
ok, so your level loaded up without a hitch, I knew it would!
ok, first thing you might need to do is change the overall height of your map, under the tweaker bar, there is a tab with your levels name on it. click there.
under level settings you will find a Terrain Height settings (currently at 163.4 or something like that) lower (or raise) this number to your liking!
switch to the terrain editor mode one more time, and go into paint terrain mode.
now we need to setup the detailtextures (much the same as the instructions state for TPAINT)
Layer1 should be grass
Layer2 should be gravel
Layer3 should be Rock
(dont kill me if I got mixed up, im sure this is write)
make sure to set the material type and low_detail_type under the tweakbar.
the rock layer (which is generally your steep mountin edges should be set to a low_detail_type of 2 (verticle) and the other two should be set to 1 (horizontal)
once you've youve chosen your textures for the 3 layers, you need to click SET LOW DETAIL TEXTURE (on the right side of the window) and choose that DefaultLowDetail.DDS file. then click GENERATE LOW DETAIL TEXTURE.
this will improve the look of your map alot!
ok, now switch to undergrowth mode, and under the render menu, switch it to undergrowth mode also (turn on the rendering of undergrowth in there too!). if you did not set up any undergrowth types, now would be a good time! once your happy with the undergrowth settings you have, switch to overgrowth mode (switch to overgrowth in the render menu, and turn overgrowth on, and undergrowth off)
again, if you did not setup any overgrowth types do that now.
change the density settings so that the overgrowth is to your taste!
ok, now Im sure you wanna jump right in to BF2 and take a look at your level but theres a few things we must do first (some obvious, some not)
the most obvious is we need to add some control and spawn points (perhaps a helicopter or two?)
whenever I create a new level, I always add a combat zone, this seems to help prevent the dreaded "terrain-of-death(tm)" where you take damage till you die. just create a simple square combatzone that surrounds the entire map.
ok, before we go any running off into the wilderness, we need to compile a few things so battlefield doesnt have a hissyfit!
start by compiling a lightmap for the terrain, the settings dont matter too much, as long as the ENTIRE primary terrain is done.
next compile a particle atlas, then a decal atlas. finally generate a ground hemi... using the default settings.
OK, now all we need to do is save.
take my advice here seriously, choose the SAVE ALL... option and make sure that EVERY SINGLE option is selected, even though you dont have roads etc. this is for a very good reason!
doing this makes the BF2EDITOR to recreate prettymuch everyfile for your level from its loaded resources. this fixes alot of those wierdo problems you can get loading a level!
alrighty, its party time, P... A... R... T... Y? because I gotta!
sorry LOL
jump into Battlefield 2, and marvel at your god like ability to create mini worlds!
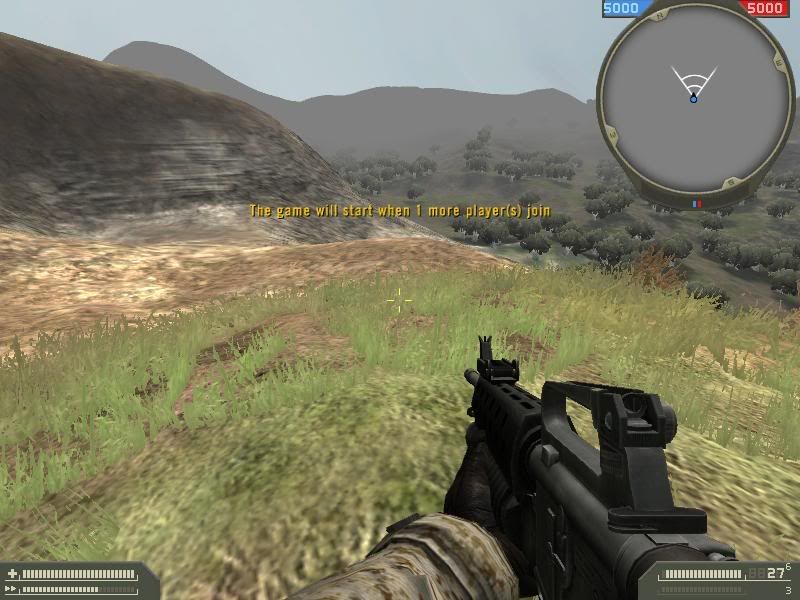
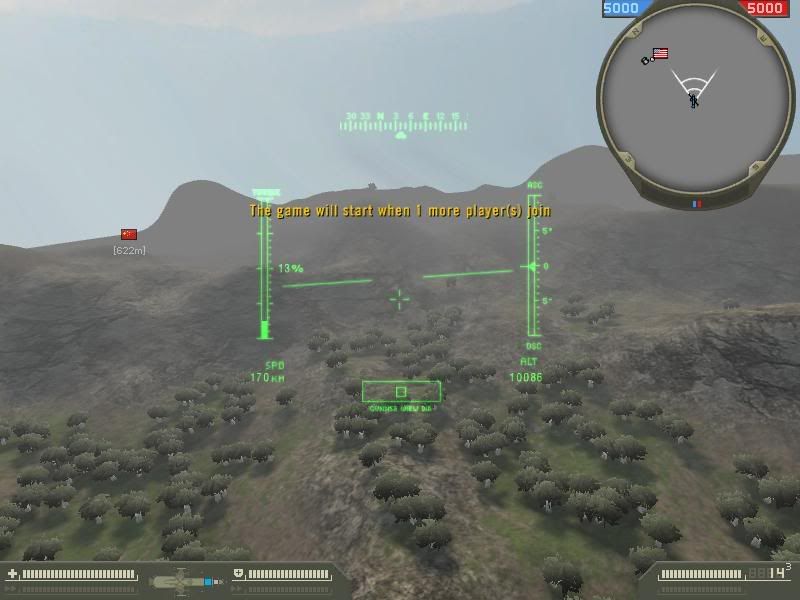

ok, there you go, complete terrain for building your level in, without actually painting anything in the editor at all!
now I would like to stress, that after trial and error for over 8 hours, the level you see in the images, and the hieghtmap I used for this tutorial were not exactly cool! I mean it still looks cool, but its not very practicle
Using Terragen and TPAINT together with your fav image editor (Photoshop, PSP) its not at all hard to create your Colormap, Detailmap, Undergrowth placement map, and overgrowth placement map.
FOR TPAINT INFO and DOWNLOAD, FOLLOW THIS LINK
http://www.bf2modding.net/phpBB2/viewtopic.php?t=27
Rendering the Colormap, and Detailmap in terragen requires you to be a registered user if terragen. well, it doesnt really need registration, but the unregistered version of terragen has an image size limit which will cause your colormaps and detailmaps to be less detailed. you will also not be able to create large hieghtmaps in the unregistered version
NOTE : if you are using the unregistered version, remember to resize the images to the correct size in your image editor before saving them to your level!!
First we start in BF2EDITOR :
Create a new level. for this test, I used a size : 512 scale 2 map. if your giving this a go, I'd suggest starting there!
whatever size you decide to use, REMEMBER, the size you choose here dictates the size of all the other images we are going to create!
once the level is created, jump into the Terrain editor, and switch to undergrowth mode.
setup 1 material using the dark grey color (15) as the materials color.
you can add some undergrowth types now if you want, or leave it till later, it doesnt matter (I leave it till later)
left-click on the terrain to paint a bit of undergrowth (this is so the undergrowth files are generated)
now switch to the Overgrowth mode, and do exactly the same as above, create a new material, choose the dark grey color (15) and paint a bit on the terrain.
save your level, and quit out of BF2EDITOR, its time for spending a little time in terragen!
Open up terragen
Time to generate ourselves some terrain.
first up is to make the heightmap the right size
in the landscape window, click Size...
on this window, in the top right you can choose the size, I chose 513 (my level size + 1)
just say yes to all the little boxes that pop up, we have no terrain atm, so these arent going to effect anything!
ok, click generate terrain... in the Landscape window and make your terrain!
these are the options I used for this test
once you are happy with the way the hieghtmap looks, close this window, and click on the Modify... button in the Landscape window
set the units to Terrain Units, then set the Heightrange from 0 to 164 and click Set Height Range.
close the window
the next step is to set up or surface map (the colors on the terrain)
if you havent done this before, it may take a bit of practice to get used to the different options!
Some things to consider. when we generate the detailmap, only 3 types of detail can be used. this does not mean that you can only have 3 types of surfaces, just remember this when choosing your surface. I have a very basic way of working this out. I use Grass, Rock, Dirt. this covers almost all terrain types and is easy to remember
when creating a surface map in terragen, you start with one material, SURFACE MAP. the main material. this material covers the entire map, and can be tricky to decide what catagory to put it in. I start off by setting this to black. and change it last to suit the other surface materials, but thats up to you.
add as many child materials to SUFACE MAP as you like, using Advanced Distribution settings to decide how the materials is placed on the terrain.
use the preview render option in the Rendering Control window to have a look what your materials look like.
Once your happy with the colors and placement of the materials, now is a good time to save your surface map (this is NOT the colormap, a surface map file is used by terrain generators to define materials for terrains)
in the Landscape window, under the Surface Map heading, there is a save button. click it and give your surfacemap a name (such as greenmountain).
Its about time to save our heightmap, click the EXPORT button in the Landscape window and choose these settings
and then save your hieghtmap into mods/bf2/levels/*MYLEVEL*/ overwriting the HeightmapPrimary.RAW file.
ok, now we need to setup the camera, the sun, and the atmosphere so we can render our colormap.
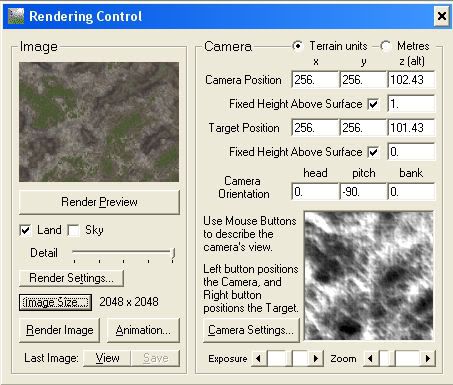
Under Rendering Control you will find a Camera Settings button, click that and you will get this window
set your settings up so they look the same as this window!
under the heading Zoom Magnification, after you have ticked Orthographic click on the AutoSetup button, and say yes to the popups. this will ensure the camera is corectly positioned!
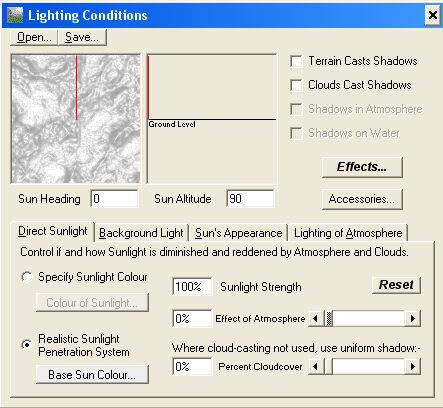
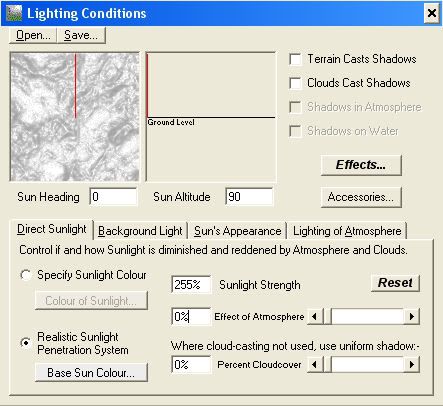
close down the camera settings window, and goto the View... menu and choose Lighting
change the lightsettings to match the above image.
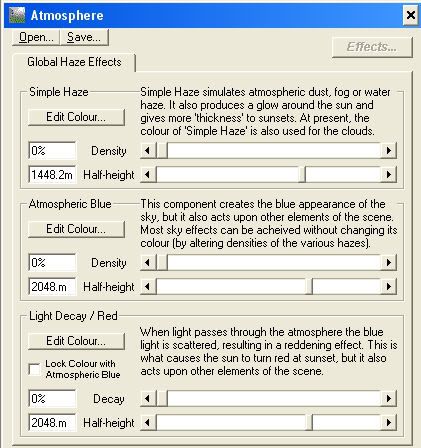
next is atmosphere, click the View... menu and choose atmosphere
move the density sliders so they are like above.
the last thing to do is set the image size. theres an easy way to work out how big it should be. take the size of your map (512) and multiply it by 4 (2048). see I told you to remember that size setting!
ok, make sure you slide the detail slider in the Render Control window all the way to the right. you can click preview render if you like, to a quick look at whats going to come out.
click the render button, and wait (can take up to 20 minutes depending on your heightmap size)
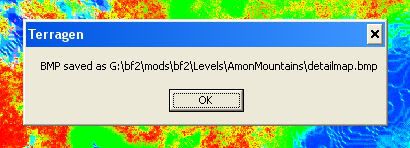
once its done save the file into your level folder
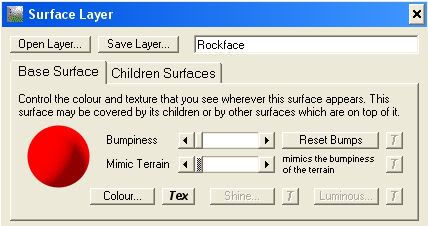
now we need to change the surface map and lighting to generate our detailmap.
detailmaps use colors to designate what material layer in BF2editor goes where, so we need to change the surface colors to match.
The reason we use only 3 types of detail is to make things nice and easy!
change the areas you want grass detail to pure blue, the areas for rock to pure red, and the areas for gravel to pure green. make sure you slide the bumpiness and mimick terrain sliders all the way to the left
open up the lightsettings again, and change the sun intesity to 255%
this ensures that the colors are infact there pure versions.
once this is done, render the image again for some funky pyskodelic action!
once its done, save the file into your levels folder
alrighty! were starting to get there now. next up is undergrowth and overgrowth, these are by far the most involved of this process, not in terragen, but in your image editor which we will get to in a minute.
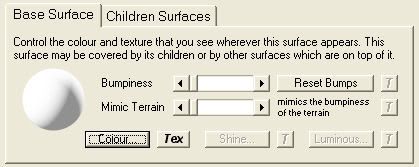
for now, you need to again change your surface map colors. this time, set the areas you dont want undergrowth to be on (say gravel and rock) to black, and areas you do to white.
if you want, you can of course create a new surface map with different options to create your undergrowth and overgrowth maps. this gives you much better control, but for this exercise we will just use the surface map we have already.
for this, we need to change the rendered image size to youmapsize(512) + 1 (513)
click render, and when its done, save this to your levels folder aswel
now depending on how your terrain is setup, and how you want your overgrowth to look, you may need to create a new surface map, or change some of the Advanced Distribution settings so that the overgrowth does not cover the same space as the undergrowth.
(I simply changed the coverage, and the minimum and maximum angle settings on my surface map to create "patches" of overgrowth)
after you have set this up, we need to render the image again, and yes, save it to your levels folder
OK, well that was a bit confusing no doubt. well we are now finished with Terragen, you can close it down now.
now its time to jump into our image editor and do some editing. for this part of this tutorial (I guess you could call it that) the details of how to do each step wont be explained. I used Paint Shop Pro to do all this, but those of you who use your image editor regularily will no doubt know how to do the things I talk about.
First up is the heightmap. for some unknown strange and freaky reason, when you load the level in BF2EDITOR the hieghtmap is the wrong way around. in order for your colormap, detailmap undergrowth and overgrowth to line up, you need to flip the heightmap VERTICALLY and then re-save it.
now would be a good time to run a smooth or blur effect onto the terrain, this is not necassery, but a low-level blur or smooth will help to make moving over your terrain easier. whether or not you should do this is mainly decided by your hightmap, and how grainy it looks.
alright, next is the colormap and detailmap.
both of these files simply need converting to TGA (24bit) and saved into the BF2_TPAINT directory under your levels main directory.
for the colormap, save it as COLOURBIG.TGA and your detailmap should be saved as DETAILBIG.TGA.
when you have the detailmap open, you may wish do run an average or blur filter on it. remember that in the BF2EDITOR, the detail textures can fade into each other. I use an average filter before saving my detailmap. but this is not a necassery step
now jump into Windows Explorer, and navigate yourself to these two files.
both of these files need to be set to read-only (I will explain why later), so do this now so we dont forget!
OK, Undergrowth and overgrowth. this is probably the most confusing part, I could not work out how to do this in Photoshop, but I am only new to photoshop, but have had Paint Shop Pro for several years. so Im sure you will know how to do these steps.
NOTE : these are the steps used in paint shop pro. you may not need to do all of these in other programs.
Open up undergrowth.BMP (or whatever you saved it as)
reduce the colors on the image to 2, using the nearest color option.
right, now the image is just plant old black and white, just what we need.
next, convert the image to greyscale.
using the COLOR REPLACER tool, we want to replace all the WHITE with almost black. Red : 15, Blue : 15, Green : 15 to be exact.
(now I dont know if its pure coincidence that the RGB values are the same as the material color number from BF2EDITOR. but I think its like that on purpose!)
now replace all the white with the R:15 G:15 B:15 color.
you should have a hard time seeing this color, thats a good thing!
alright. thats it for undergrowth, not that confusing hey (ok it was) now we save the image.
In your levels main directory there is a file called Undergrowth.RAW this is the file we want to replace. make sure when saving you have 0 header information and IBM byte order.
now, for overgrowth we do EXACTLY the same process above. so load up the overgrowth.BMP (or whatever you called it) and do the steps above, using the same R:15 G:15 B:15 color to replace the white.
this time, save this file as Overgrowth.RAW in the Overgrowth folder of your level.
THE FINAL PHASE
ok, now we are ready to use TPAINT to create our devided color and detail maps.
if you do not know how to use the TPAINT program, I would suggest having a read through the tutorial from the link above. for installation and use information.
jump into the BF2_TPAINT forder, and run BF2_TPAINT.EXE untick these options
click go, and wait for it to finish.
now I told you I would explain why we need to set those files to read-only.
Well, when you run TPAINT, it generates the two files COLOURBIG.TGA and DETAILBIG.TGA which it then uses BF2_TSPLIT to break them up into the DDS files BF2 uses. if they are not read only, TPAINT will overwrite them with its own generated colormap and detailmap, which is a bad thing for us!.
ok, now as the instructions for TPAINT state, you now need to copy the Colormaps and Detailmaps folders to *yourlevel*/editor folder replacing the two folders that are already there.
EXCELLENT. now its finally time to jump back into BF2EDITOR and finish this off!
load your level back up, watch the debug window for any "could not load" etc. if this happens, one of several things could be wrong. you have saved a raw file in the wrong format, or one of the raw files is not the right size. if you were paying attention, you will have seen which file it was loading, and which file to redo.
ok, so your level loaded up without a hitch, I knew it would!
ok, first thing you might need to do is change the overall height of your map, under the tweaker bar, there is a tab with your levels name on it. click there.
under level settings you will find a Terrain Height settings (currently at 163.4 or something like that) lower (or raise) this number to your liking!
switch to the terrain editor mode one more time, and go into paint terrain mode.
now we need to setup the detailtextures (much the same as the instructions state for TPAINT)
Layer1 should be grass
Layer2 should be gravel
Layer3 should be Rock
(dont kill me if I got mixed up, im sure this is write)
make sure to set the material type and low_detail_type under the tweakbar.
the rock layer (which is generally your steep mountin edges should be set to a low_detail_type of 2 (verticle) and the other two should be set to 1 (horizontal)
once you've youve chosen your textures for the 3 layers, you need to click SET LOW DETAIL TEXTURE (on the right side of the window) and choose that DefaultLowDetail.DDS file. then click GENERATE LOW DETAIL TEXTURE.
this will improve the look of your map alot!
ok, now switch to undergrowth mode, and under the render menu, switch it to undergrowth mode also (turn on the rendering of undergrowth in there too!). if you did not set up any undergrowth types, now would be a good time! once your happy with the undergrowth settings you have, switch to overgrowth mode (switch to overgrowth in the render menu, and turn overgrowth on, and undergrowth off)
again, if you did not setup any overgrowth types do that now.
change the density settings so that the overgrowth is to your taste!
ok, now Im sure you wanna jump right in to BF2 and take a look at your level but theres a few things we must do first (some obvious, some not)
the most obvious is we need to add some control and spawn points (perhaps a helicopter or two?)
whenever I create a new level, I always add a combat zone, this seems to help prevent the dreaded "terrain-of-death(tm)" where you take damage till you die. just create a simple square combatzone that surrounds the entire map.
ok, before we go any running off into the wilderness, we need to compile a few things so battlefield doesnt have a hissyfit!
start by compiling a lightmap for the terrain, the settings dont matter too much, as long as the ENTIRE primary terrain is done.
next compile a particle atlas, then a decal atlas. finally generate a ground hemi... using the default settings.
OK, now all we need to do is save.
take my advice here seriously, choose the SAVE ALL... option and make sure that EVERY SINGLE option is selected, even though you dont have roads etc. this is for a very good reason!
doing this makes the BF2EDITOR to recreate prettymuch everyfile for your level from its loaded resources. this fixes alot of those wierdo problems you can get loading a level!
alrighty, its party time, P... A... R... T... Y? because I gotta!
sorry LOL
jump into Battlefield 2, and marvel at your god like ability to create mini worlds!
ok, there you go, complete terrain for building your level in, without actually painting anything in the editor at all!
now I would like to stress, that after trial and error for over 8 hours, the level you see in the images, and the hieghtmap I used for this tutorial were not exactly cool! I mean it still looks cool, but its not very practicle
Comment